The next three pages gives details of the freight cars I am building and those I am planning to build. For cars currently being built I have included details of construction and modifications . I will aim to update the photographs frequently as construction progresses. I have also included plans of some of the cars I plan to build.
As explained on the previous page the, layout was designed to use rolling stock of 14' length, the size of the Chivers kits. The logic behind thinking was that the first few cars I built would be kits, to get something running reasonably quickly, and I could then scratch build additional cars.
To operate the layout as designed requires a minimum of eight freight cars. Using this number however would mean that the stock on view never changes. If instead an allowance is made for the newly built train of 5 cars to leave the yard, and then be replaced with 5 new cars (possibly with a different locomotive), the minimum requirement becomes 13 cars.
This page and the two that follow contain three sections; Rolling stock under construction, thoughts on truck placing and planned future stock.
Rolling stock under construction
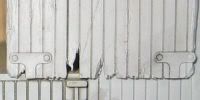
Whilst I was building the kit I was looking through a book and saw a photograph of a maintenace of way car on which most of the bottom part of the door had rotted away and I decided to create a similar effect on this model.
Finally I modified the roofwalk, in the kit the three planks are moulded as one piece but I separated them so that they can be added with a prototypical gap between the planks (Hint: from one who learned the hard way, attach the roofwalk supports first using the intact roofwalk for guidance, it is easier this way than trying to do it after the roofwalk is in three pieces).
This section covers progess of stock building and also covers some of the ways I am varying from the kit instructions for each car.
 This car had a number of changes from the standard kit. Firstly it has an interior (see Hints & Tips -> Boxcar interior).
This kit is being built more or less as per the instructions. The only slight variation I made was to distress the deck to represent a car that had seen some service.

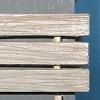
I added wood grain to the surface of the deck by scratching with a razor saw and also with a craft knife. While I had the knife in my hand I also made a cut at each board end to increase the appearance of the deck having been constructed from original planks. Note that actual flat car decks would have used boards with a stepped joint (like half a tongue and groove floorboard) th spread the weight and keep the floor together, but this would have been so difficult to simulate I went for representing square cut planks.
This model will be different from the basic kit in that the kit is for a ventilated boxcar but my model will be a reefer with ice hatches. As I have not yet reached that stage in construction there are no photographs, so a description will have to do. The kit will be built mostly as standard execpt that I will not be fitting any of the ventilators but will instead be adding ice hatches to the roof. I have yet to decide which style of hatches to add, some cars had the hatches direclty on the roof while others had a planked deck with the hatches set in. Originally I was going for the latter approach but because they would be bigger they may look out of proportion on a shorter car, so may switch my plans to hatches directly into the roof.
As per the gondola above I have distressed the deck and cut into the sides to increase the appearance that it has been constructed from separate planks. I have also painted the deck to represent unpainted wood. Note that I do this, and also paint the side and end rails, before construction because I find this easier than trying to paint straight lines between separate parts later.