This page is a weekly log of progress on any of the layouts and/or rolling stock covered by this site.
Well, so much for keeping this blog up to date! In truth, I have been working slowly on a few things, at opposite ends of the scale by size
Firstly, I have bought a kit for an SM32 flat wagon, constructed from laser cut MDF. I have not really started this yet, but have just been testing painting and staining using some of the discardable material. On previous wooded construction I had used a thin wash of black enamel in thinners to represent grey weathered wood on the decking. As this kit is MDF I was not too sure this would work but thought I would test it anyway. The result, as expected, did not show a wood grain, however it did add a weather look and I think it may work if I vary the strength between planks so that they do not all look identical.
The other purchase was the oppsite end of the spectrum - T gauge (1:450, 3mm gauge). This is not sold as narrow gauge, and I plan to add a Warship body to the chassis and build a Pulse Width Modulated controller. However, if this works out then another chassis could be used to represent 2 or 3 foot gauge at a scale of 1.5mm/ft or 1mm/ft repectively.
On my OO9 rolling stock I have done some more painting. This was kicked of when my local model shop started stocking Railmatch enamels, I bought SR and GW freight stock colours and have started painting the recently built wagons allocated to those companies.
Finally whilst shopping recently I notice railway items being sold by Siku.
The trams and the passenger coach did not look too promising, although the diesel loco may be useful.
What I actualy bought was the openb wagon - a European style stell mineral wagon which looks too scales out very well for a long 4 wheeler in OO9.
Not much to report at the moment.
The most significant thing I have bought is a Peco OO9 Dennis body kit (the tramway locomotive).
As this has the fully covered wheels there is a large choice of chassis can be used.
I plan to build it on either a Kato 0-4-0 tram chassis, a Bachmann 0-6-0 Plymouth chassis or a Bachmann 04 chassis.
I will decide which when I see the space available in the body shell.
What I will do for this update is to explain the latest logic behind the OO9 rolling stock I am building, which has changed during the construction period.
Originally I was building several wagons, mostly short 4 wheel chassis (fortunately unlettered), for a totally freelance line which started out as Welsh, but later changed to North Yorkshire.
I also had some longer L&B rolling stock kits under construction.
The problem with this scenario was that I was building two separate groups which could not logically be operated together.
So to fix this I came up with the following mixture of prototype and freelance, spread over 3 different companies, which would also still give me a varied mix of stock and interesting operating potential for any future layouts.
Location: Devon, so as to allow L&B rolling stock accurately lettered
Company 1: L&B. Long and short rolling stock. Short stock only could be used for a branch with limited loading (to cover possible use on on micro layout). Stock would be accurate models plus other later vehicles and 4 wheel coaches - so part prototype and part freelance.
Company 2: GW. Totally freelance other than the name. Mostly large stock, similar to L&B 8 wheeler and possibly larger, to allow a more mainline feel, althought limiting use to a larger layout.
Company 3: As yet unamed. This would be all the freelance 4 wheel wagons and coaches, plus a few short bogie wagons, that I have been building.
This should allow me to design various layouts to use the stock, ranging from micro layouts to larger main lines, with more that one company represented for operating potential, and also allowing a mainline and a branch on a larger layout.
Some images of the locomotive kit and goods wagons I have been working on recently.
This is the first photograph for a locomotive kit I have recently started.
This is a Peco kit which I have modified to allow it to be used on a Lifelike 0-6-0 chassis rather than the Farish 08 chassis that it is designed for.
Also I have updated the images for two goods wagons.
The first is a L&B van from a Parkside Dundas kit which I have started to paint.
The second is an 8 wheel van that I had not previously photographed.
This has been converted from a narrowed OO van body (Hornby, I think) using a Bachmann underframe. In the photo this is in primer, but since this was taken I have started painting it in dark grey, similar to GW wagon grey.
After rather a long time of silence I am intending to continue with the updates to this site.
Whilst I have been silent on the site I have not been doing too much modelling, however I have made some progress which I intended to report on over the next few weeks, along with my current model making as it happens.
I also hope to get some new photos of my stock on the site, as many of these are not up to date now.
The item which I have been working on most recently is a loco, the old Peco James kit.
No photos as yet, but the body is mainly built, just needing details.
The kit is originally intended to use the old Farish 08 chassis, the previous version with the inside frames.
Whilst I could have got such a chassis the lack of cylinders spoils the look in my opinion.
The new Farish chassis can have cylinders added, but I understand that it is too big to fit this kit, having been designed to fill the 08 body.
I have therefore converted my kit to fit the Life Like 0-6-0 chassis.
Great Railway Journeys is still running, so again less time spent model making than may otherwise have been the case.
For future building, as if I have not already got enough to be getting on with, I have ordered a loco body kit - Chivers RC27 freelance GEC diesel.
There is a recommended chassis for this kit, although I do know that it can be made to fit on a Kato tram chassis.
I am not sure if the footplate casting in the kit can be made to fit, but I do know that if not then a plasticard footplate can easily be made to replace it.
One of the reasons for getting this kit - other than not currently having a HOn30 loco to run with my scratchbuilt rolling stock - was to determine if it could also be built as a centre cab by combining 2 body kits with a BoBo chassis.
Watch this space for a report on wether this seems as though it will be feasible.
As regards actual progress - I did start the Unit Models OO9 loco body kit that I bought at Wakefield exhibition. All that I have done so far is to clean up the cab and open out the windows. As this is such a simple kit there should not be a great deal more to do - the majority of the work remaining is in cutting down the body on the N scale Plymouth it is designed to fit. The loco I am planning to use already has DG couplers fitted, so there is a chance that even I could have the loco completed this year!
The main progress that I have made is on one of the Chivers On30 kits that I ordered at the back end of last year.
These were a 14' high side gondola and a tank car.
I have made a start on the tank car.
First job was to assemble the two halves of the tank.
After this was dry some clean up was required to ensure that the joint which runs along the top of the tank would not be visible.
I also spent some time of the decking, cutting at the end of each plank to make the deck look more like it was constructed from separate pieces rather that fitting together too perfectly - the wagons the tank car will run with will not be finished in a pristine state so a worn appearance will fit in better.
With this car I am planning to investigate two ideas that I had after first constructing some of these kits but never got to try at time.
These are to lengthen the wheelbase and to lower the body.
The reason for considering these changes is that firstly the proportions do not look quite right to me - the trucks are correctly positioned from the end of the car as regards the 2 foot gauge rolling stock, but with the car being so short this does not look quite right.
I think moving the trucks nearer to the car end should be easy.
The reason for wanting to lower the car is again related to 2 foot gauge rolling stock.
The kit as built has a body height similar to 3 foot gauge prototypes, but th two foot gage stock that I like was generally lower.
The difference was not too great, but the simple difference of being able to see the whole wheel bleow the car side or not makes it visually significant.
I think it should be possible to lower the car, although this will then mean that the couplers will need to be made higher to restor them to the correct height.
I had previously written a web page detailing these possible changes to wheelbase and car height.
If the process works out I will update this page with photographs of the actual conversion.
Not much progress this year - blame that on Great Railway Journeys being on TV every single weekday night, no sooner do I get time when I could be doing some modelling that the next episode is on!
Not that absolutely nothing has been happening though, between Christams and various shopping trips I have been collecting models and materials towards future layouts.
At Christmas I recieved 3 Roco European freight wagons - which I had chosen myself - to go with the locomotive and 2 wagons I had already bought for a planned Spanish layout.
I also received 3 British wagons - I knew I was getting 3 wagons but not which ones, so that part was a suprise - ready for a planned British shunting layout.
I still need to get a locomotive, probably a pannier tank, and some more wagons for that one.
I also got a book on the Darjeeling Hill Railway.
I have not had time to read it yet, but there seems to be plenty of inspiration in there for me to end up planning yet another layout!
I also placed an order for 2 On30 14' freight cars from Slimrails - these are the kits designed by by Roger Chivers, but are now manafactured and sold by his son Simon.
I placed the order immediately after Christmas to beat the VAT rise, but in the end Simon doid not raise his prices anyway.
The kits I bought were a high side gondola and a tank car which will go with the boxcar, refredgerator, low side gondola and flatcar that I already have.
I am not sure yet if the layout will be building will be a one point (also refered to as a tuning fork), an Inglenook or a Timesaver.
Provide it is not a 5-3-3 timesaver then I now have enough cars, althoug for a 5-3-3 I would need 2 more, but either way I do not have a locomotive as yet so will need to think about obtaining one or building one using the several possible chassis I do have.
I have also been re reading my Bob Hayden scenery book over Christmas.
Spurred on by reading what I could create - if I ever do get a layout to the scenry stage(!) - I took to opportunity of two different shopping trips to get some acrylic paints and gloss medium.
The paints for genral scenic work including colouring rock castings, and the gloss medium for modelling water.
Not much progress to report since the last update othere than a small amount on my OO9 minimum space layout (which still does not have a name) where I did a little work on the manual operation of the uncoupler magnets.
What I have done before at this time of year is to take stock of the layouts that I am building or have plans to build.
As my main interest is in building rolling stock, either scratchbuilding or from kits, I do not focus too much on layouts.
This is why I never make much progress in this area, and also why all but two of the layouts under construction or planned are small shunting layouts - some with only a single point.
Even though I knew I had planned a few layout to run my various items of stock I nevertheless did suprise myself at the length of the list when I wrote down all the plans I had.
The 13 layouts, that I was able to remember, are listed below;
| Scale | Gauge Model | Gauge Proto | Trackplan | Name | Country | Rolling Stock | Layout | Comments |
|---|---|---|---|---|---|---|---|---|
| N | 9mm | SG | Timesaver | England | 2 wagons converted to DGs - 4 more needed. | Some points bought | Minimum space timesaver using Peco setrack points and 15' wheelbase wagons | |
| OO9 | 9mm | 24" | 1 Point | England | Rolling stock and locos available | Board built and track laid. Building complete except for painting. Work needed on uncoupler and point operation and then scenery. | An attempt to build and complete a small layout so that I could do some layout detailing rather than just stock building. | |
| OO9 | 9mm | 24" | Terminus | Airedale | England | Rolling stock and locos available | Board and track complete, ballasting mostly done | This layout can be run, but after problems with the manaul point operation mechanism it got put to one side to sort out later. |
| OO9 | 9mm | 24" | Rabitt Warren | England | Rolling stock and locos available | Still need to decide on the construction method for this one - harboard/plywood or foamboard. | My only plan that is not a shunting layout. Just something I would like to try - although not sure if my planned 6" radius curves will really work. | |
| HOn30 | 9mm | 24" | Inglenook | Skowhegan & Athens | USA | Rolling stock scratchbuilt. No specific US outline loco as yet. | Points saved, track cut to length. | Track was laid on a board but I decided to use a single board rather than 2 so lifted the track. Kept separate ready to reuse at a later date. |
| HOn30 | 9mm | 24" | Timesaver | Lakewood | USA | Rolling stock scratchbuilt. No specific US outline loco as yet. | Board and track complete with uncouplers and point motors. | Layout is usable, but need wiring completing fo full operation before scenery can be added. |
| O9 | 9mm | 15" | Inglenook | England | Some wagons scratchbuilt. Loco built from kit, complete except for painting. | Some Peco N gauge track and points prepared (every other sleeper removed) | Model of an estate railway using long (for 15" gauge) wagons, both 4 and 8 wheelers. | |
| HO | 16.5mm | SG | Inglenook | Spain | Loco and rolling stock bought/arriving 25th December. | Plan only | Always the plan to try something different! | |
| HO | 16.5mm | SG | Timesaver | USA | Locos and rolling stock bought | Some points bought | Have been planning this layout since operating a similar one at a layout in 1980. Not built yet, but there is still time! | OO9 | 16.5mm | SG | 1 Point | England | Some stock arriving 25th December | Plan only | I have never built a British OO layout so though it about time I did. Will probably have a GW setting - for no ther reason than the fact that I like pannier tanks! |
| On30 | 16.5mm | 30" | 1 Point | Riverside Yard | USA | Rolling stock kits started, ordering 2 more very soon | Plan only | Layout will use Chivers 14' rolling stock kits. This layout was originally planned as an Inglenook Sidings trackplan. |
| On30 | 12mm | 24" | Inglenook | USA | None | Plan only | Just an idea I am investigating to better represent the stock width/track gauge proportions of 2 foot gauge stock using modified Chivers 20' kits on Hom track. | |
| 1n20 | 16.5mm | 20" | Inglenook | USA | Some rolling stock scratchbuilt/converted | Plan only | An attempt to build some stock that looked larger on the rails that On30. |
I braved the snow and attended the Wakefield model railway exhibition as planned. Fortunately the weather was good and I hope for the clubs sake that attendance was not too low as I do know that any club depends on it's exhibition financialy, at least there did seems to be a good attendance.
As usual there was a good standard of layouts there. Nothing specific to the scale/gauge/location/style of the layouts that I am building or have planned (more about this in my next update), but still plenty of inspiration and ideas that I could incorporate into my layouts or plans.
Of course I did not come away empty handed. I had already contacted two of the traders and had items put aside for me.
From Unit Models I bought a 009 loco body kit to fit the Bachmann Plymouth that I already have avaialble with DG couplers fitted.
From Contikits I bought a Roco HO RENFE locomotive and some freight cars for a future layout
I also got some magazines from the club stand. These do seem to have doubled in price since last year, however at only 20p each I did still get 15 to read for only 3.00, i.e. less than the cost of one current issue.
Not content with what I bought at the exhibition I later visited my local model shop and bought some brass rod and tube, and also 2 N gauge points for the N gauge layout I am planning using the wagons I have recently converted to DG couplers.
The brass rod and tube will be for point and uncoupler magnet operation on my 009 layout.
My current thinking is to have the point and magnet able to be operated from both the front of the layout (for home use) and from the side (for exhibitions).
I think I have worked out a simple way to do this, I will add more details if it works out. Although the point is only about 3 inches from the edge of the layout I think that some remote operation is still better than reaching over the scenery and getting the rails greasy by operating the point direct - especially when I will need to work out some method of operating the uncoupling magnets.
Regarding the uncouplers, I have already attached 2 magnets to a strip of wood at the correct width so they can both be central under one side each at the same time.
I have checked these and proved that I can move them far enough to the side to prevent accidental uncoupling when they are not in use.
In my next update - unless there is too much other progress to report - I plan to cover briefly each of the layouts I have under construction or am planning to build.
This list should cover quite a few combinations of scale, gauge and location!
I am looking forward to the Wakefield exhibiion this coming weekend - if you are reading this in time, and you live near, then this is always a good exhibition.
I will be hoping to come away with plenty of inspiration for new layouts (despite having plans in my head for for another four layouts in different scales/gauges, possibly more details in a future post).
I also have a few plans of locos of kits to buy, having already been in touch with the traders who will be there, which I will definately update about in a future post.
I have also added a photograph to the site, although no actually done any more work on, the Hornby van body that I am converting to 009. I did have some Chivers L&B bogies on order for this, but no sign of them as yet.
I did also get bored of waiting and started modifying two Peco N gauge wagons to DG couplers.
What is the relavance of bored here?
Well I had thought that there was more than just talk of the manafacturers changing the standard N gauge ready-to-run coupler to one that could be uncoupled, possibly even with delayed action, magnetically.
As yet I have seen no sign of this happening, at least this side of the Atlantic.
Why am I modifying N gauge wagons. Well, that is one of the four planned layouts mentioned above.
This will be a shunting layout using either a Bachmann 04 that I already own - converted to DGs - or else a small steam loco.
I will update with more details when there is something to show.
I have ordered some 009 bogies to complete the long van I started from a Hornby body plus one other, and also a pair of Ratio coach sides, but I am still waiting for these to arrive.
I started the O9 kits that I received from Avalon some time ago. These were a complete van (i.e. separate body and chassis units to fit a Peco chassis) and also a pair of bolster wagons.
So far I have only worked on the van kit, and on this I have added headstocks from thick plastic sheet, as this is the one part that is not included in the kit.
On this wagon I now have to decide on whether to use the chassis as is or to change it to lower the body.
The standard kit looks fine as it is, but I had already scratchbuilt some O9 wagon and so I may need to make these chages so that it will look right running with what I already have.
On my 009 micro layout I have cut a slot for the uncoupling magnets - I am using permanent magnets which will slide to the side when not in use to prevent unwanted uncoupling.
I have covered the slot with clear packaging material (from a pack of Peco tunnel mouths) so that I can see throught to the magnets for setting things up, but can later add scenery and ballast over once the mechanism to move the magnets is complete.
I have also attached the first section of track.
Other: thoughts on kadee uncoupler using 2 magnets
Another very long gap since the last updates, and not much progress to report during this time, but that is the effect that summer holidays and light evenings have on my modelling output.
Alas the evening are now turning darker, which would generally be seen as a bad thing, but may result in having more to report here over the coming weeks.
I ordered and received some Avalon O9 kits, a van and two single bolster wagons to go with the O9 wagons I have scratchbuilt. As of yet I have not started these kits, although they are easy to assemble so should not take long to complete when I do.
I have also started another OO9 wagon based on a Hornby OO 6 wheel van which I bought from the Skipton exhition.
This will be high is comparison to my other stock, but I think it should work out OK if I can get it low enough on the bogies.
THe van scales out to 30' long, which is just a little longer that my Lynton & Barnstable bogie stock so should look acceptable as a more modern wagon when running with them.
Currently I have separated the sides from the ends and roof.
I had been hoping that the original body would have a separate roof which would have made this an easier operation but fould that the sides/ends/roof are a single moulding.
Once I have completed cleaning up the sides I will add attach them to a floor, add ends and a roof, and then work out how to add bogies and couplers.
One decision I need to make, bearing in mind that the way I make my couplers non reversible so that my wagons can not be turned, is whether to use both van sides on the one model, or whether to build a blank side from plasticard where it will not be seen thus effectively getting two models for the price of one.
The other decision is whether I use bogie or body mounted coupler.
Body mounted are not as daft as they seem bearing in mind that my HOn30 rolling stock, scaling out to 20' in 4mm scale, use these and run round Peco 12" radius points.
If I restricted this vehicle to the new Peco 18" radius points - which I plan to use anyway for my L&B rolling stock - then I think it may work.
The advantage of body mounted couplers is better running, especially when reversing long trains.
One other thing I did was to draft a layout plan that I have had a mind to build for some time;
 |
I had originally tried to fit they layout into a shorter length, but by lengthening it slightly I should get enough room on the staight track at the front to create a passing loop using 2 Peco N setrack points. This will only allow length in the loop for a loco and one, or possibly two, 4 wheel coaches, but I think this would be the longest train that would be feasible on the layout anyway.
I have also just noticed that this months Railway Modeller has an article about building rock cuttings from cork sheet. I have not read the artice yet, but looking at the photographs the effect seems to be just what I would need for this layout.
Another period of doing bits here and bits there, resulting in not a lot of progress to report.
I have bought a tractor and a chassis to build a rail vehicle. This is to be built for the NGRM Challenge 2010, and will be constructed as an old tractor used as a power unit for light shunting duties on a narrow gauge line. I have not yet decided on the exact details, but I think I will add a wooden cab to represent a vehicle that was hastily and cheaply assembled from whatever materials were to hand at the time.
I have also started working on the Dapol Pug kit that I bought some time ago.
Originally I was going to construct this as a 009 locomotive, but have now changed my mind and will be building it for 09.
This will be built on a Bachmann Plymouth chassis as a tramway locomotive.
Due to the change in scale I will raise the boiler to give the locomotive the required bulk to look correct, and will probably build it with an open cab similar to my current 09 diesel locomotive.
I do still have a problem in which way to place the body on the chassis.
Ideally I would have the motor under the boiler so as to leave the cab area clear, however due to its size it is on the limit as to whether or not it will fit, and if not then I will need to build it the other way which will leave the motor filling the cab.
Hopefully when I have build the chassis/footplate unit I will get a better idea of what is or is not possible.
I have added some more pages to the site, these are the start of the section which will deal with the layouts that I am building.
Currently only the most recent layout, at an early stage of construction, is covered.
| ||||||
I have also bought a Dapol pug kit which will be used to create a 'pugbash' type of 009 loco. Initially I had been planning on using a Trix 0-6-0 chassis with full valve gear that I bought some time ago, but on testing this chassis I find that it will only run well when going forwards. I am sure it worked when I bought it so not sure if the storage did not agree with it or if I did not realise how bad it was. Either way it is not worth building a loco on, so I may use a Life Like 0-6-0 chassis which I also have in stock.
This months Railway Modeller contained an artice on an 09 layout, Brink Valley Tramway by Christopher Payne.
Reading the article and seeing the high standard of modelling and the effectiveness of the rolling stock has encouraged me to make some more progress with my 09 stock.
To that end I had ordered some wagon kits from Avalon to run with my scratchbuilt stock that I constructed some time ago.
I did also have a plan for a 09 Inglenook Sidings layout, using foamboard and to be the same size as my 009 micro layout.
The idea behind making them the same size was that by building in suitable ledges on the baseboards the two layout could be made to fit back to back so as to provide protection whilst in storage.
I had also begun begun preparing some Peco N gauge setrack and points to represent 15" gauge track by removing every other sleeper.
By trail and error I found that this could be done to the points whilst still leaving them with enough strength so as to not impact on their operation.
I will need to buy another sheet of foamboard to begin this layout, but when I do I will add a page to the site covering its construction.
Progress on this layout will probably lag behind my 009 layout as it will use the same methods of operating the uncoupling magnets and points and so will use that layout as a proving ground for these.
It has been rather a long time since I updated this blog, so as I have done quite a bit since the last update I will keep the comments here short.
I have create a few more rolling stock pages pages as part of the site redesign. Pages added this week are;
| ||||||||||||
I have just bought, and recieved, a Caramel chassis. This is sometimes reffered to as a Carmel bogie as it is so short. Basically it is an 0-4-0 chassis with a wheelbase of 12.6mm and an overall length 24mm. I have a few ideas as to what use it will be put, watch this space for updates!
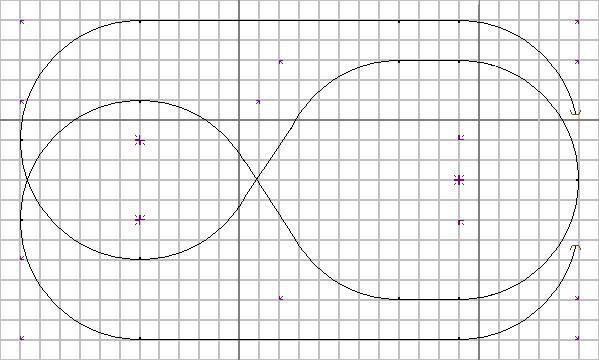
I have added more track to my test track in the form of a spiral which I can use to test the minimum radius for any given locomotive or train. To do this I needed to move some track around on the basic oval that I had started. What I now have is an oval of 9" and 10" radius, plus an inner spiral with curves of 8", 7" & 6". If I need more I can add them when I get some more track - I think the Caramel chassis would probably be happy on 3" radius if I could get the track curved that sharply.
For my L&B bogie rolling stock - or any other stock I build - I think I have worked out an easy way to build bolsters using Ninelines bogies simply by soldering a 10BA bolt to a strip of brass. With these bogies I think just the heigth of the bolt head and the thickness of the brass will be enough to provide vertical clearance for the wheels.
I have done some more design on my small 009 shunting layout. Just how much design can you do on a layout 24" long before you start laying track? Well, quite a bit it seems! Although I have not got any track layed as yet I do have it all cut to length and with feeders soldered to the rail joiners ready to go. The next thing I want to work on prior to fixing the track is the uncoupling mechanism using permanent magnets below the board which will slide to the side when not needed.
Also connected to this layout, I have attached a platform to the wooden building which will be the main rail served industry on the layout. This is currently just 0.060" plasticard, so will need a representation of a brick plinth to bring it to the correct height.
I do plan to add a page about this layout very soon.
Once I do you will be able to see photographs of the layout and building(s) at various stage of construction.
The reason I do not specify the number of building is that I originally planned only one, however I may end up using a second tall building as a view block to suggest that the track does continue beyond the layout.
I have create a few more pages as part of the site redesign. Pages added this week are;
| ||||||||||||
I have solved the probelm with the OO9 locomotive that I was having difficulty with.
The problem was that I had built the loco around a chassis which I had cut down for use under a railcar, and when the railcar was ready for its chassis back and I tried to fit a full sized chassis I found I had not left enough length and it would not fit.
I had been considering rebuilding the running plate of the loco so that I would not have to cut the chassis down and could easily swap the chassis for a new one if needed.
Before I did this however I rechecked and found that the difference was slight and decided I could make it fit without major surgery.
What I eventually did was to simply use a piece of coarse sandpaper and rub the upright chassis over it to take a little length from both ends.
Doing this had the advantage that as I was removing material slowly I could get the chassis to be a really good tight fit, so much so it will almost stay in place with no other fixing.
All that is left to do now is add couplers and then paint.
I have also added couplers to one of the 4 wheel coaches that I am building. This no qualifies for my classification as 'operable stock' in that it has a completed chassis and couplers, despite the fact that it still does not have a roof!
I did say that I would explain the rationale behind the Lynton & Barnstaple stock I was building, hinting that I would not actually be an accurate model of the L&B at any time during its life. What I am planning on doing is modelling the line in 1938, which is after the time when the prototype had ceased running. By choosing a later date, which is exactly what I am doing with my Skowhegan & Athens HOn30 American rolling stock, means that there are two categories of rolling stock that I can build;
| a) | I can make accurate models of any of the rolling stock used by the line in its later years | |
| b) | I can also freelance models of wagons based on later construction practice which the L&B never actually used. Although I have only extended the time frame by two years I am assuming the line is still a going concern, therefore there would have been much more stock building in the previous years than was actully the case when the line was not in profit and seeing reduced demand. | |
I have continued to add further pages as part of the site redesign. Currently I have completed the 009 section within rolling stock, and over the next few weeks I will contiue to add the pages for the other scales in which I am working.
Pages added to date are;
| ||||||||||||||||||
At the weekend I visited the Narrow Gauge North exhibition in Leeds. As usual this was a very good show, with the obvious emphasis on narrow gauge. There were a number of excellent layouts, in a variety of scales, which providing me plenty of continue with my own rolling stock and also to actually make some progress with the layouts that I am in the process of building.
As usual the 009 society sales stand was present. I had been looking for a small 009 loco ready to run but nothing there quite fitted what I was looking for, however I did manage to pick up a few other items. The first of these was 2 HO standard gauge boxcar bodies with combination doors, which can be cut down in width to create HOn30 boxcars. Interstingly one of the bodies already had pencal marks exactly where I will need to cut, so it look like the previous owner had the same idea but never got round to doing it. I also picked up 2 more Colin Ashby 4 wheel coach kits which will go with the 4 I already have and have partly built. Other things I picked up from elsewhere was one N gauge Micro Trains boxcar which added to the other I have been slowly collecting now gives me enough to operate a Timesaver or Inglenook Sidings type layout. I also bought several old magazines, mostly Continental Modeller, so I will have plenty to read (when I am supposed to be getting round to building models!)
What I also saw, but did not buy at the time, was a book on Indian narrow gauge steam.
This book looks to be full of ideas for building Indian rolling stock, including many colour photographs.
One thing I do not need is any more distraction from what I am alreadsy building - but that has never stopped me before so I may get hold of this book soon.
Not much progress on the new layout, although I have done some more work on the main building that will be the rail servered industry on the layout by beginning to prepare the platform on which it will stand.
This will take the form of a concrete slab on a brick base which will serve as both a foundation for the building, and also be set to a height to serve as the loading platform.
I have begun working on the redesign of this site,mentioned in previosu updates, so that it better reflects the fact that I build a lot of rolling stock but never seem to get anywhere when building layouts!
You will begin to see new pages appearing on the menu bar over the coming weeks.
During the development they will all contain the box below to identify them as new pages.
Initially they will be towards the bottom of the menu list, but later on I will start moving them up into more logical positions, and later still when all they new pages are complete I shall start to remove the old ones which have been duplicated.
The first new pages which I have added today cover 009 and the passenger coaches I am building in this scale.
|
||||
I do not have any photographs as yet, but I have finally begun the small 009 shunting layout that I have been planning for some time. It is amazing how much planning can go into a square foot of layout - the board is 24" x 6" - but I find that with such a small layout the planning it is too easy to plan down to the smallest detail, even down the where the oil drums will be stacked, that the time taken is out of all proportion to the layout size.
As mentioned before, this layout is being constructed from foam board. This is a new technique for me, and I have mixed feelings about what I have done so far. On the one hand cutting the parts from a large sheet of foam board is quick and easy, but I found that glueing using a hot glue gun has to be done quickly otherwise the glue cools and sets before the parts are joined and I had to revisit several joints to get the strength I wanted.
Next to do will be to work out exactly where the track will go so I can cut holes for wires, point operation and uncoupling magnets before fixing the track.
I am also starting a redesign of the pages in this site.
As I have built different layouts to the ones I had originally planned the current organization of pages no longer seems the best.
I am planning to arrange the pages differently to reflect the fact that my main interest is building rolling stock with layout construction often taking a back seat to more wagon building.
The new site layout will concentrate more on the rolling stock in all the different scales I model in (currently 009, HOn30, O9, On30 and 1n20) and allow the layouts to be separate and favour those layouts that are currently being worked on regardless of scale.
I will definately do my best to avoid 'Under COnstruction' notices replacing active pages, and broken links, during this process. There may however be a short time when the same information is available on two pages as I will not delete the old pages until the new ones are complete.
It has been some time since my last update, although this time I do have progress to report
Firstly I have made the decision that the 009 micro layout (2'x6" with just one point) will be built on a foam core board not a chipboard shelf.
To that end I worked out the sizes for all parts needed - main board, backscene, supports, end panels etc - and marked them out onto a 30"x20" board to minimise cutting and maintain accuracy.
I have yet to cut the parts out, but am hopeful that when I do it will all go together very quickly using a hot glue gun.
The other progress has been on my 009 rolling stock, in particular the larger wagons that I am adding to my fleet.
I have made a start on the Nine Lines kits I bought - a van and an open wagon, both from the Lynton & Barnstaple.
The open wagon (not shown, I will get the photo up when I have completed the main body) has holes for the bogie mounting bolts drilled right through the floor, as I want to run this wagon empty I plan to add a new floor over the main chassis to cover these.
The other wagon shown here is a Parkside Dundas OO kit for an LNER DX open container.
This is only a fraction wider than many of my other kit built wagons, so I have attached it to a Peco N gauge 15' chassis for a quick and easy large 4 wheel open wagon.
Still to do on this are adding headstocks and wooden sills to cover the metal one of the chassis, also removing some of the ironwork hanging down from the chassis - basically removing everything which does not look like narrow gauge brake gear.
Still not much progress other than some preparation work on two Lynton & Barnstaple 009 kits, so this time I will cover more of my plans for the year which did not get mentioned last time.
The first additional thing I plan to do is not very exciting in itself, but is required for the second, as will be explained below.
This first thing is a test track, or more precisely two test tracks.
Currently I have one test track which is a loop of track for running in locomotives which has a point facing towards the centre but with no track leading from it at the moment.
I plan to add a spiral track for this point with curves of 8", 7", 6", etc with half a circle at each radius and a short section of straight track between so that rail joints need not be on a curve.
The logic behind this addition is to be able to test the actual minimum radius for a given locomotive to pull a given train whislt staying on the track and coupled.
The second test track will be separate from the above. This will also be a spiral - although without the outer loop - but for this the track will rise half height each half turn. Half height in this case being defined as half the height that one track will need to rise to be able to clear a second track. This height will depend on the stock I plan to use, and will also need to take account of the clearance for the thickness of the track bed for the upper track. From this set up I will be able to determine the minimum radius around which a train will run whilst gaining enough height to pass over another track in one loop.
So the reason for all this testing? Simply that I am planning, later in the year, to build a rabbit warren style layout and want to know what minimum radius/maximum gradient I can use for a large percentage of my current rolling stock without causing operational problems. I know that rabbit warren style layouts have fallen very much out of favour, but I have never built one before and as all my other planned or in progress layouts are small shunting layouts I would like at least one layout which will allow trains to run. I think that if I plan it correctly I should be able to build some operation into the layout as well without it needing to get too large. Who knows, if it works out then I may offer the layout for exhibitions - although that will be next year at the very earliest so do not hold your breath!
As for operation I have one or two ideas that I have already been considering for automatic train control.
The idea here would not be to totally take control away from the operator, but would basically be a method for running several trains on the same loop of track with electronics to slow or stop any train getting too close to the one in front.
I did find a circuit to power a section of track and also control accelaration/decelaration such that the power could just be pulled from a locomotive and it would slow to a stop, and then pull away in a controlled manner when power was restored, but when checking the components needed I find it used two very old transistors (I did get the plan from a 1970's Model Railway Constructor) so I am on the look out for an updated circuit diagram.
The circuit I am wanting is not a full hand held throttle, just a couple of transistors, a capacitor, and other components as needed to be able to run a locomotive at a reasonable speed.
This should be able to be built quickly and cheaply enough to have one for each electrical section needed.
So far this year I had not done very much - everywhere I can work has been too cold, so I have retreated to warmer parts of the house until this cold spell is over!
I have managed, between watching the TV, to doodle lots of plans and decide what I will be concentrating on this year, so that is what thus update will be about.
I have got two small layouts planned, one on 009 and one in 09, and hope move on with these once the weather warms up.
I already have all the trackwork and rolling stock needed to make a start on these.
Originally I had planned to use chipboard to construct these. However having received a hot glue gun for Christmas, and already having some foamboard, I am now thinking that I will try and use these for the baseboards.
I may need to get some more foam board to complete both layouts, but other that than I should have all I need to give it a try.
To recap on the thinking behind these two layouts. Both layouts will be self contained and only 24 inches long. The reason for building two together is that I plan to make the boards with the backscene interlockings such that the two layouts can be stored fastened back to back with the scenery and trackwork protected inside.
On the rolling stock from I will be continuing with my 009 fleet, although one specific new area I will be building in is Lynton & Barnstaple stock.
My thinking here is to model the L&B, under SR ownership, several years after the actual line closed down by making the assumption that it reamained more profitable for longer.
By making this assumption I can the model the rolling stock which was actually used, and also add wagon that may have been built if the money had still been around in the later years.
That logical will also apply to locomotives and passenger vehicles as well as the goods stock.
By building these wagons to the same standards, and with the same DG couplers, as my existing stock I will retain the ability to operate any of the stock on the same layout.
I currently have 4 kits for actual L&B wagons, and have ideas for quite a few 'might have been' wagons.
Finally, the other area in which I hope to make some progress is my 1n20 fleet.
Currently this is one part finished boxcab locomotive, based on a bachman chassis, and 4 freight cars at various stages of completion using construction techniques varying from HO car conversions to scratch building.
I plan to complete all this stock and then build at least 2 more so that I will have enough to justift building a layout.
Happy new year to everyone, hope you all had a good Christmas and received all the gifts that you were hoping for to add to your layouts.
During this time I have not even attempted any model building, but I now have books and kits for inspiration and to extend my fleet of goods wagons.
For Christmas I received two books, one on small narrow gauge layouts which is indeed full of inspiration for future layouts, and also Iain Rice's book on etched loco kit construction. Additionally I will also soon have a book on Spanish narrow gauge, although that is stuck on the Amazon slow boat and expected sometime during January.
Befoe Christmas I ordered myself two Lynton & Barnstaple kits from Nine Lines, an open wagon and a van, which have now arrived. Have not had chance to open the packets yet, but I plan on starting these very soon.
Whilst out and about after Christmas I visited Monk Bar Models in York and bought 2 Peco N gauge chassis for use under 009 bodies and also some SR stock brown from railmatch.
The paint will be for the two kits, for which I also plan to order some Fox transfers and finish in accurate SR era livery. How does this go with my existing 009 stock? Well, it does not do so at all, but I do have a reason in mind for finishing them like this.
Keep an eye on the site and early in the new year I will expalin my thinking behind this and what I am planning to do.
Some time since my last update - some may say 'nothing new there then' - mainly due to decorating, however some small progress made.
This is my first update since the Wakefield exhibition.
Seems so long ago now, but there were some very good layouts there, and nice to see Draigh Goch for the first time.
Despite the time away from the work bench between I still have the inspiration to get at least one of my layouts finished sometime soon.
Only got one thing from the club sales stand, but what I did also get were several old magazines from the club stall, including a whole year of Model Railway Constructor from 1970.
Very interesting to see the standards of modelling at the time - many featured layouts having unballasted track, but others very well finished with first class scenery and buildings.
One thing which did amuse me was that the caterers provided wooden stirrers rather than spoons.
Was that wise in a room full of railway modellers?
I wonder how many of those were harvested off to become lineside buildings/wagon loads etc never having see a cup of coffee?
I also finally managed to complete my test track, which had been delayed due to running out of rail joiners!
I have a number of new chassis which have never had a good run before, as none of my layouts have a continuous run, so I have been giving these a work out to get them well run in.
One loco that I had not been happy about was a Bachmann 0-6-0 under an 09 body kit.
This did not seem to have the control needed when running back and forth on a short piece of track, however now that I have run it for longer it seems to be working as I would have expected and should certainly been up to the task of operating on a shunting layout.
The final thing I have acheived, and the main sucess of the week, is that I have completed and proven a test unit to operate points by memory wire.
I had been part way through a previous unit, but decide that the size was getting out of hand - I did want to be able to mount it under complex pointwork - so I decided to start again.
The unit I have now build is 1" wide and about 5" long, so will just about fit under a Peco 009 point - and it could be made a fraction smaller if needed.
This unit, which I was hoiping to photograph but did not manage to do so, operates from 3v.
For testing I am using 2 x 1.5V batteries, but it should be easy to generate suitable power from a 12v supply when used on a layout.
In operation the points change faster than with a tortoise or similar switch machine, but still do not have the rapid movement or the noise of a twin coil point motors.
Price wise I would think they would cost less than half of what the twin coil machines are retailing for, possibly less depending on the final method of construction.
I really will try and get a photograph on the site, as this will very easily show far more than I can explain in words.
Over the last 2 weeks I hve been making changes to the site to address problems with the volume of images being downloaded.
I have completed the majority of work on this now, and hopefully all the images on the site should be visible as normal.
If anything is not showing up then please do let me know.
I have done some further work on my experiment using memory wire for point operation.
I had previosly proved that the wire could change a point, but that test was basic and could only pull a point one way.
What I have now done is to create an assembly from brass strip and a bolt as a pivot.
This should enable me to connect up two lengths of wire and be able to fully operate a point.
If this works out then it should be a lot cheaper than using a solenoid point motor and will not have the noise or rapid movement that result from using them.
I will try and get some photos loaded soon, but I was waiting until I had cured the download problems first.
I have also been working on some N gauge settrack which I paln to use for a 09/On15 layout. To remove the N gauge appearance I have removed every sleeper. I had previously done this on a short section odf straight track, but I have now manage to do it to a point. I was not certain if doinf this would leave the poit too weak, but it does seem to have worked out OK.
Finaly I have done some more work on a 009 coach which I am building using the left over parts after building a 009 from a Parkside Dundas coach kit. All that was left was were some sides and part of the floor, so I needed to rebuild some ends from scribe plasticard sheet. I plan to use a stetched N Peco gauge chassis under this.
This coming weekend will be the Wakefield model railway exhibition.
This is always a good exhibition (slightly biased maybe as I was a member of the Wakefield club for several years, but let my membership lapse when I moved away in 1985) with a good standard of layouts, and also a good range of trade stands.
I hope to come away from this with plenty of inspiration for future models - and also to actually get a layout completed some time soon.
This week, as not too much has happened (yet again) I am giving a recap of the motive power under construction for my 009 layout.
Pictures of two of these have appeared on the site before, but for the other 3 these are the first photos I have uploaded.
Click on any photo to see a larger image
This locomotive has been shown many times on the site.
It is a shortened Knightwing 00 scale body on a Kato 4 wheel N gauge chassis.
Since the last photo the side frames have been added, using the original Kato sideframes cut down and with the distance between the axleboxes reduced to match the chassis used.
Still to do is to angle the lower corners of the buffer beams and cut the beams for the couplers and add handrails from brass wire. Once done the body will be ready for final painting.
This van is a Corgi body mounted on a Kato 8 wheel short chassis.
Other than removing a pillar from inside the body no other modifications were needed.
By shortening the chassis footplate by a very small amount, probably less than 1mm, it becomes a snug push fit into the body.
This now just need painting and the glazing refitting to be ready to run on the layout.
As yet I have not decided on a colour scheme, but do not plan anything too extravagant as I see it representing more of a working vehicle than a company PR excersize.
This vehicle will be finished as a passenger railbus.
It entailed significantly more work than the van above.
Not so much on the body, which is almost unchanged, but on the chassis which had to be heavily reduced in size to be able to fit within the body.
Once the body is painted and attached to the chassis I hope to be able to refit the original wheel arches (which are not shown in the photo) by reducing their width from the inside until the fit against the chassis with the correct amount sticking out from the body.
As this vehicle is to serve the passengers I plan to paint it in a red and cream colur scheme to match the coaches I have already painted. I may also add a roof rack to disguise the hole in the roof.
This is the latest vehicle I have been working on, and is actually the only progress I have made in the last week!
The body is a Parkside Dundas coach which I reduced in length before construction (I have also started on a coach which uses the parts which were cut off - so no waste).
The ends were already marked out on the rear for the windows, so cutting those out was very little effort.
The chassis was cut to fit over the Kato chassis before assembly, using the Knightwing diesel chassis as a pattern as this used the same chassis.
There is not much else needed to complete this model - obviously glazing and a roof are needed, but the latter is included in the kit.
I do however paln to investigate how much of an interior I can add, the motor is fairly low in the body so I should be able to add a fair representation of seats and possibly passengers.
This loco is, unusually for me, a kit built exactly as intended.
The body is easily constructed (if you can master soldering that is, I did struggle a bit!) as it is only 3 parts - 2 x side/end units and a roof, and fits directly on to the Kato chassis.
Unfortunately this loco and the railcar above are currently sharing a chassis, so I will need to buy another one before they can run at the same time.
I have not yet decided how to finish this kit - with all the windows and grills it is very open and so demands a representation of an engine to give the correct profile when sen through the grills, but I have noy yet decided whether it would be better with the cab areas separated off or left as one open body.
In addition to the above I have a Peco body kit and a F&C diesel body which I have not yet started working on.
For chassis I have Lifelike and Trix 0-6-0 chassis with cyclinders and valve gear, and a Farish 04.
The Peco kit should work with either of the 0-6-0 chassis - not sure which will work best although the Trix has the better looking valve gear.
I had intended to use the F&C body on a Kato chassis although the width could be a problem so I may investigate the 04 chassis which I know to be a good runner.
Only al little progress to report - yet again!
I have 2 small layouts ready to start, both 24" x 6" making them just one square foot, but when I dug out the timber that I was going to use to create the baseboards from I found it had been stored in the damp and was no good so at the moment I am just waitin until I get round to buying some new.
The one bit of progress on my rolling stock was to dig out a Parkside Dundas 4 wheel coach kit that I have previously started.
The limit of previosu progress was to paint the sides marron, however I deicded that this was not as effective as I had hoped so I started by stripping this finish.
Once the paint was of and the sides washed and dried I assembled them, but without the chassis.
The original chassis for this kit create a very low slung coach, but I am planning to build it higher, more in keeping with my Colin Ashby kits.
In line with this plan I intend to build a new floor and use an extended Peco N gauge 10' chassis.
For the livery I may paint this coach in a Lancashire & Yorkshire two colour livery - more details on how, and why, if I actually decide to follow this route.
The other area of progress, where I have been quite succesful, is a test in using memory wire for point control.
I bought the wire from rapid electronics (who sell it as smart wire) and built a simple test rig using 80mm of wire to pull on a Peco 009 point.
When conected to a battery the wire contracted with plenty of force to change the point, and whilst doing so quickly it was still slow enough to avoid the rapid movement and noise associated with twin coil point motors.
Rather than use the method of one wire, permanetly energised to move the point one way, and a spring to return it I have used the method of having two wires, one to move the point each way.
When using points with over centre springs this means that the wire does not have to be left energised other than whilst the point is actually changing.
The way I have set up my test, i.e. using wire leading directly away from the tibar, could be used as is when space was not limited, although where there is more complex pointwork and therefore less free space I think a unit with a crank should be possible which will more or less fit under the one point.
Assorted bits and pieces done since my last update.
I have started building a 009 railcar.
This will be a 4 wheel unit, using Parkside Dundas coach sides and a Kato chassis.
As yet I have only started cutting the sides to the required length, so there is plenty more to do on this one.
Unfortunately I have had to use more than half the original coach side for each side of the railcar, so can not consider making 2 identical railcars from the one coach, however what is left will be enough to asseble into a shorter coach.
I have done some testing for sizing on my planned 09 layout using Peco N gauge setrack point. I was unsure if using the points without extra track between them would leave the siding too close, but testing proves that although close it is possible. Hopefully this will look OK in a lightly used, but tight for space, estate railway setting.
Also for this layout I tried removing every other sleeper from a length of track to try and get the look I was after. This seemed to go OK, with the track still having more that enough strength that it should not casue poor running. The next experiment will be to acheive the same effect with the points!
Whilst on with this layout I bought the second point that I needed and was able to assemble the whole layout trackplan on a temporary board - the advantages of biulding a layout entirely with setrack!
I started fitting the new Kato chassis to the Knightwing body, leaving the original chassis for Classix van. Unfortunately, as I had already cut the first chassis down before completing the chassis, I now find that it will not fit between the ends of the chassis. The difference is however only about 1.5mm, so it should be an easy matter to cut the chassis down slightly to get a good fit.
Finally I managed a bit more track laying on my circular test track.
I have almost the full loop down now, but I need some more rail joiners before I can complete this.
I plan to use this board to test out point operation using memory wire/smart wire.
Another limited report again this time.
I seem to have had so may other tasks to do recently that model building was pushed to the side, although I have used some of this time to plan future projects.
On the 009 passenger railbus I am building from a Classix van I have completed the preparation of the body and stripped the paint. I was keen to get this done as I have another 009 rail van plus an 09 loco which are also at this stage, so I plan to get these three primed together.
I have also started a test track.
It had been some time since I have been able to do more than run a loco back and forth on a piece of track, and none of the layouts I am building allow contiuos running, so many of the chassis I have bought for 009 projects have never yet been run in.
In addition to a loop of track I also plan to add a spiral in the centre, which will enable me to test the minimum reliable operating radius for any mixture of locomotive and rolling stock.
Having just bought another Kato 4 wheel chassis - which is already spoken for - I have been giving some though to building a railcar which could sit one. I had originally thought of using an Eggerbach western style coach, but am now thinking of using part of a Parkside Dundas bogie coach to create a longer railcar. I will need to do something of a mockup to ensure that what I have planned does not look over long for a 4 wheel chassis. Watch this space!
I have also been giving some though to using memory wire/smart wire for point control. All uses of this wire I had previosuly seen used a single wire and a spring, so that the wire would need to be permanently energised to hold the point one way with the spring used to pull it the other way when the current was cut off. I plan to investigate the use of two wires, on the pull the point each way. Combining this with a Peco point with its built in over centre spring will, if it works out, mean that the wire will not need to be kept live. Again, watch this space!
On other though I have been having (I did say I had been having more time to think than to do!) was for a small layout, or more specifically two layouts.
The layouts were not a new thought as I had been planning them for a while, one 009 and one 09.
What was new is the plan to build both, even though separate layouts, together and to the same depth and backscene height.
Doing this means that, if I contruct them with it in mind, they will later fit together with one upside down and reversed, which will protect the scenery whilst they are being stored.
This is not a new idea as such, many people plan sectional layouts this way, it was just the idea to use the same principle on layouts which were small enough to not need a baseboard joint.
I have had a bit of a break from updating this blog over the school holidays.
During this time I have not managed much modelling, although I have made some progress.
I sent off an order tp Parksaide Dundas for two 009 kits, a coach and 2 single bolster wagon, plus an A1 models body kit for the Bachmann chassis.
I have already started the PD kits - the coach body is assembled but awaiting the chassis, and one of the single bolster wagons is complete awaiting couplers.
One thing worth noting about the coach kit (DM04a, a reissue of an earlier freelance coach kit), which is the reason that I bought it, is that if you have any of the now out of production Colin Ashby coach kits then this coach is almost exactly the same size and will look right in the same train.
I also visited the Skipton model railway exhibition over the bank holiday weekend, and whilst there bought the newly released A1 boxcab body kit to fit the Kato 4 wheel chassis. So I now have two brass body kits to build. I guess my next task will be to but some more chassis! I will also have to decide whether to assemble the kits using glue or solder.
I have also made progress on three of the locomotives, all in different scales, that I am building.
On my 009 diesel I have done more work to complete the chassis by adding the side frames with axleboxes. I have created these by cutting down parts from the original knightwing kit.
On my 1n20 boxcab I have also added the sideframes to the chassis, although on this one there are no axlebox details as yet.
I am still undecided as to whether to add axlebox castings (possible 0 scale tender axleboxes) or to add hinged plates to represent covers over recessed axleboxes.
On my I have trimmed and added the font coupler link casting to clear the DG couplers I am using.
This now completes the kit, so it is ready for painting.
Finally in 009, I have raised the height of one of my wagons.
When checking the wagon I realised that the couplers were far too low.
Looking at the chassis on this wagon I decided that even with the DGs mounted directly on the underside of the chassis, rather that on the packing that I usually need to add, they would still be too low.
I could have built some cranked shaft couplers, like I needed to do for a Snailbeach hopper wagon which also had a low chassis, but decided to try another method first.
I knew that I had a set of larger than normal 009 wheels, from a previous kit, and tried these in place of the supplied wheels which were almost identical in size to Peco N gauge wheels.
With the replacement wheels the couplers were almost spot on, but due to the limited clearance the wheels would no longer turn as they were now touching the underside of the chassis.
I cure this by cutting out parts of the chassis above each wheel - this means that the wagon will now need to be run with a permanent load but that is not a bad trade off to have so easily fixed the coupler height problem.
A small amount of progress in each of a number of different areas this week.
009
I have now completed the roof on the industrial building.
This was more complicated than first appeared due to the need to cut the roofing material to the correct angles first.
The difficulty mainly being holding parts in place and then being able to mark off where to cut - too few hands and not enought room to hold all the peices at the same time!
I did eventually get that parts marked after using carboard templates, and once done it all went togther quite well.
Next step will be to design the platform and then paint the building.
Other progress in 009;
The rail van now has chassis mounts at both ends.
These mounts were deliberately added 'too high up' in the body, such that I can then adjust them to the ideal height by adding packing and adjusting by eye with the chassis in place
I have also added coupler mounting pads to the chassis on three more vehicles; a coach, a van and an open hopper wagon.
Once the end beams have been trimmed DG couplers can be fitted to these and I will have 3 more pieces of operable rolling stock.
I have started work on a Peco locomotive body kit I bought some time ago.
I plan to use this kit on a Life Like 0-6-0 chassis, and have attached the buffer beams to the footplate in readiness to make whatever changes are required to attach this chassis.
Finally in 009 I have done some work on the chassis of the diesel loco I am building.
I plan to obtain another Kato chassis for this loco as the one I have has been cut down for use under a railbus.
This chassis will still work under the loco, however as it will equally easily accept a full length chassis it would seem better to save the already cut down one for the railbus.
1n20
The steel chassis flatcar now has a completed wooded decking.
This car is now fully painted and operable (trucks and couplers fitted), but still needs detailing (grab irons, brake wheel, coupler lift bars), lettering and possibly further weathering.
On the boxcab loco I have cut, but not yet trimmed, some chassis side frames.
Once these are in place the fact that the chassis is a six wheeler will not be visible - a good thing as the boxcab I am modelling will represent a four wheeled locomotive.
I have not yet fully decided on the axleboxes I will use, but I may look into using O scale tender axlebox castings, which can simply be glued onto the flat chassi side frames in line with the outer wheels.
Odd bits of progress here and there this week.
On the rail served industry I am converting from Wills garage kits I have assembled the walls and part of the roof.
Now that I have photos on the site you can see the arrangement of walls I settled on far better than from my description last week.
I still need to add the roof to the right hand end of the structure, but I have already cut the angles on the roofing material ready to do this.
Initially I was planning on fitting the building with a brick plint and then butting the freight platform up to this, however I am now considering using a large solid concrete platform with the entire building on top of it.
On my 1n20 rolling stock I have begun attaching the pre weathered wood planking to my . The car has been completed for some time, as has the timber for the decking, but it was waiting for me to get some more CA adhesive so that I could begin joining the two.
One other thing that was held up by the lack of CA adhesive was the rail van I am building (I am also building a rail bus, but have not managed to photograph that yet).
The body for this was already stripped and the post inside the body which previously held the chassis removed.
Last weeks progress was to begin attaching plastic strip front and back inside the body to act as a mounting point for the Kato chassis.
Currently the front one is attached but not the back one.
Once this is done I can get the body painted and then refit as much of the interior as possible whilst leaving room for the chassis and the model will be complete.
Not too much to report, but did not want to leave it too long since my last update!
I have made some more progress with the lineside light industial building I have been constructing from Wills Station Garage kit parts. I have now decided on the final design and am well on with the construction. Alas no photos as yet, which would make things clearer, but my plan is for a building with 3 gable ends two of which have loading doors plus a further section sideways on. The front of the building will have a full length platform, with the wooded walls raised on a brick foundation to the height of the platform.
I am also ordering some decals from Robbies Rolling Stock to create a private owner wagon (or 2 if I just apply the decals to one side of each wagon!) and a tank wagon.
Other progress was to trim a Kato 8 wheel chassis and remove the N gauge couplers.
This is planned to go under a Corgi OO Austin J2 van body to create a rail van.
For this I needed to trim a small amount - only about 1mm - from each end to allow the chassis to fit inside the body.
I plan to superglue some plasticard strip inside the body to hold the chassis to the correct height.
I also have a Classix van and a very cut down Kato 4 wheel chassis with which I plan to build a rail bus.
Will try and get some photos soon.